MODJU Speaker
A speaker shouldn’t be a static object, it should grow with you and your space. Modju lets users change the look of their speakers over time with a range of interchangeable panel kits, reducing aesthetic fatigue and strengthening attachment through ongoing personalisation.
Project
University Major Project
Industry
Audio Equipment
Duration
5 months
Design Brief.
"Design a sustainable analogue speaker with a focus on material and visual modularity, encouraging users to have a longer-lasting connection with the product."
Idea Generation.
From the outset, I envisioned a speaker with a familiar design language—something approachable and timeless. The core idea centered on exploring how material and form could be used to transform its aesthetic.
This led to the concept of a modular speaker system: a central speaker unit with interchangeable outer panels, allowing users to adapt its appearance to different styles and environments.

Kit Options.
I took an extended amount of time to carefully create the topics for the kits, making sure that the titles accurately represent the personality that will match the aesthetic. I plan on initially having 4-6 different kits available to ensure there are plenty of options. As a brand point of view, there could be a new collection of kits reeased each year, adding an element of exclusivity to previous kits.
Attaching Techniques.
I prototyped different ways to attach the panels to the speaker. Although the model was much smaller than the actual speaker would be it still showed proof of concept. By using my 3D printer I was able to make the prototypes with precise accuracy, using a nozzle size of 0.4mm allowing me to make adjustments to tolerances as little as 0.1mm. The overall scale of the model is 1:5.

Panel Fixings.
Following my early development work, I continued to investigate how the modular panels of my speaker would be fixed to the side of the core cabinet.
I had an idea of a push-fit plug connector that would be gripped by a bushing, this would allow me to keep the number of components low making for a simpler and intuitive use.
From my initial sketch I 3D printed the concept to see how the form looked in person and test tolerances between the plug and bushings. I tested tolerances from 0.1mm to 0.4mm to see which had a fitting that was tight but also easy to remove without too much excessive force. The best fitting tolerance for the 3D printed parts was 0.2mm.


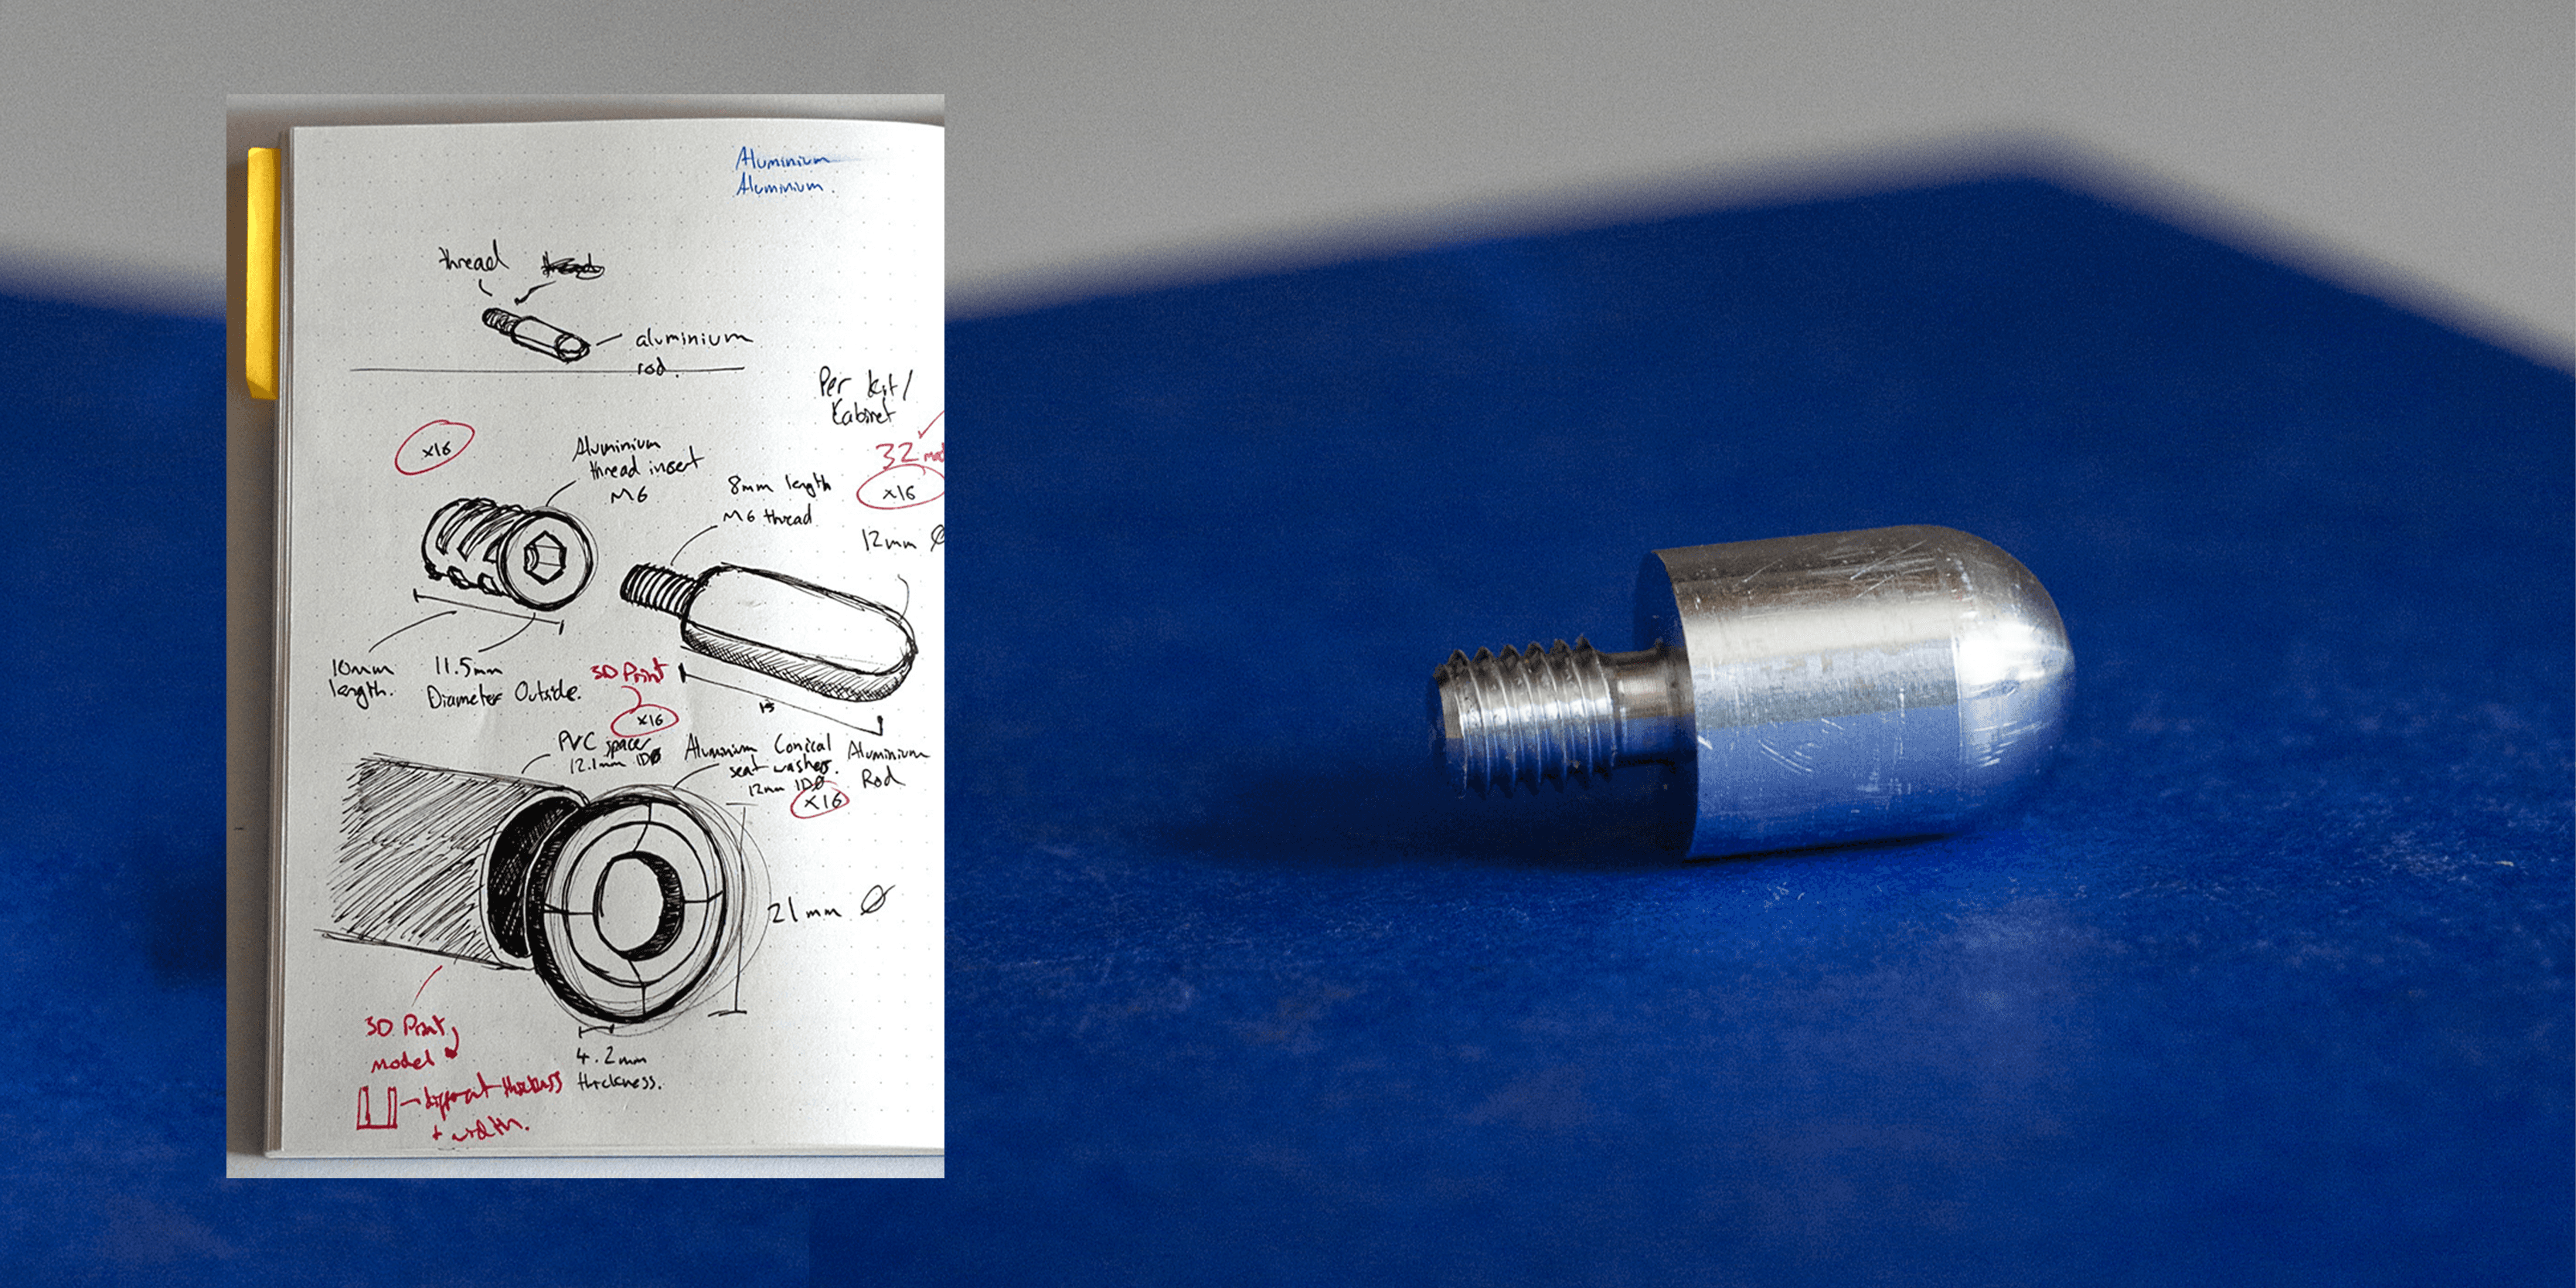
Custom Machining.
After I was happy with the design I got the part custom made from aluminium, this is the material I would use for this part, emphasising the attention to detail and quality of manufacture that has gone into the design.
I am satisfied with how the part came out in the end however after applying it to my speaker and seeing how it looked I thought I could do with focusing on how the plug part attaches to the panel, the visible screws lower the perceived quality and sleek look of the part, so finding an alternate solution would take the design a step further.

Branding.
When designing products, the brand plays a crucial role in shaping their look and feel. Since this speaker was still in development, I had the opportunity to build the branding and product simultaneously. The brand’s visual identity must seamlessly reflect the speaker’s design. I created a blocky logo that was minimal in colour and complexity, allowing the design of the speaker panels to have the full focus of the viewer.
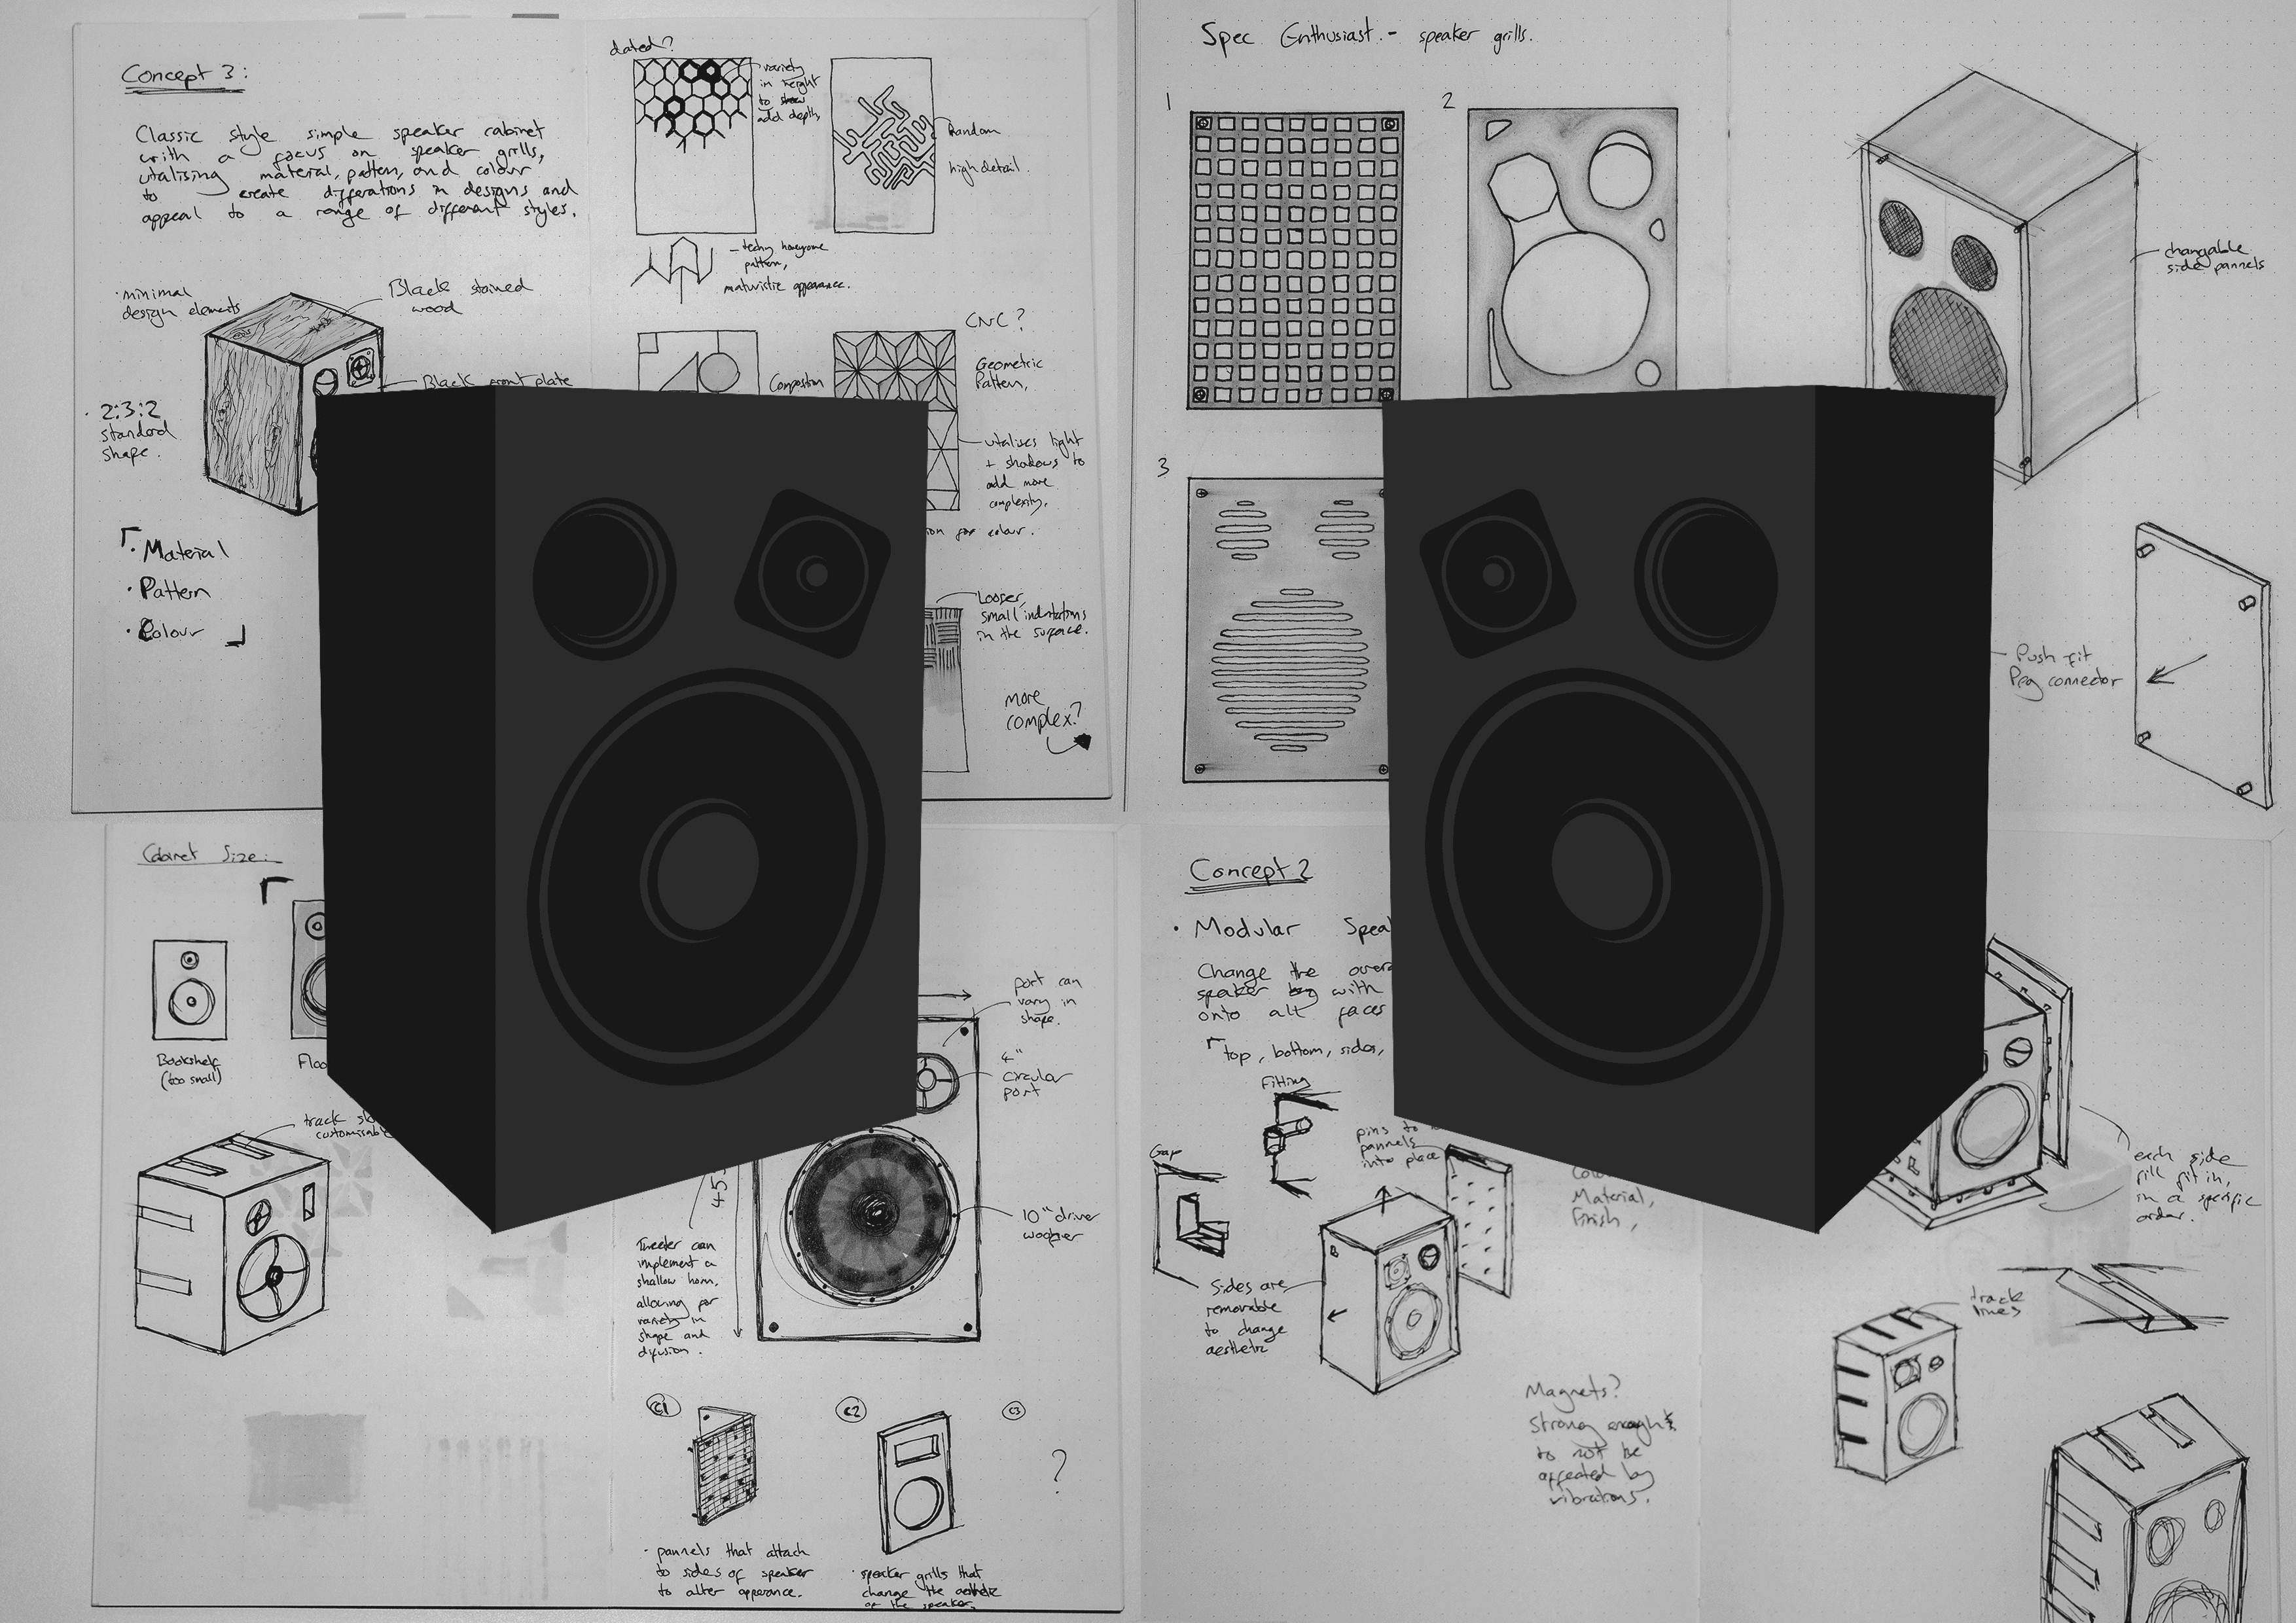
Panel Kit Concepts.
I refined my initial concepts, showcasing a consideration for materials and core functional details that enable the product the function. The design of the speaker boasts a simple shape of few materials keeping the complexity of the construction to a minimal because the panels will add aesthetic value and interest.

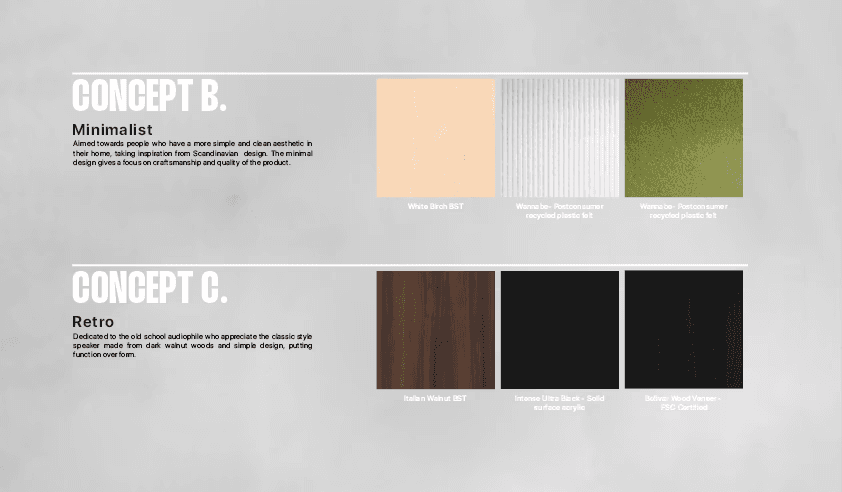
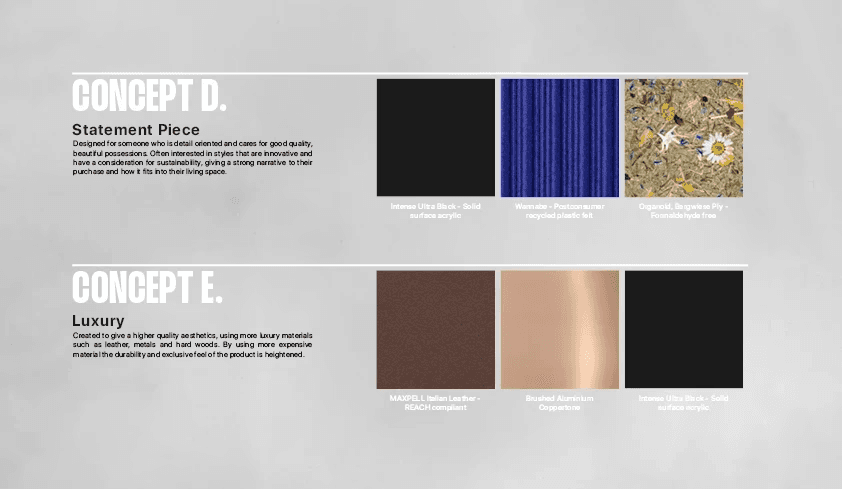
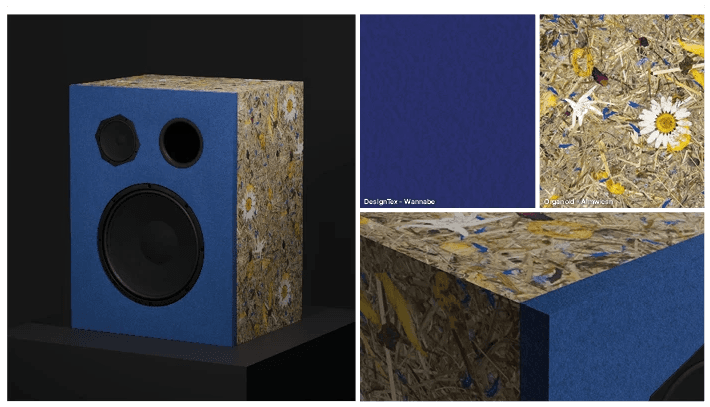
Statement Piece.
The statement piece focuses on sustainable material, pushing the boundaries of what a speaker can look like. The use of bright colours and a busy material in a simple silhouette will catch people’s attention, appealing to a specific type of customer.
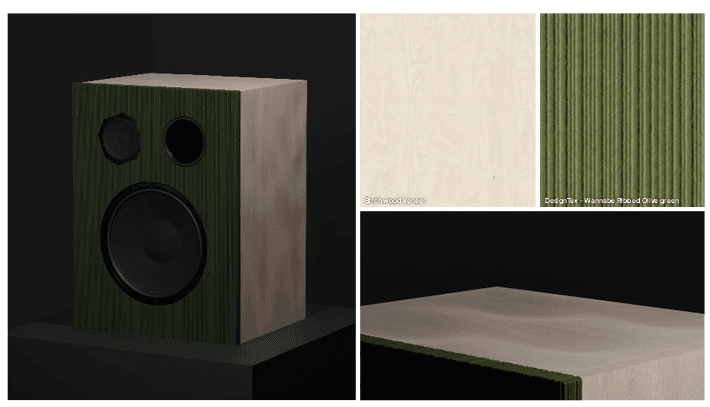
Minimalist.
This design uses form to add interest, the wavy wood effect is elegant and draws the viewer's attention without being loud. The pale wood and olive green colour give a Scandinavian aesthetic that will suit many people's home decor, The shape and small details are something that this buyer type would appreciate.
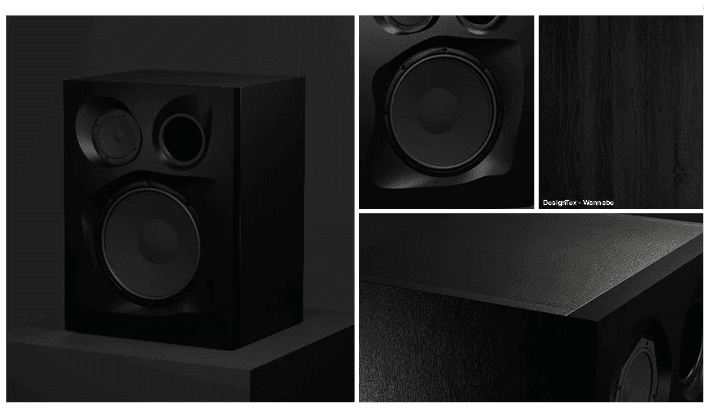
Spec Enthusiast.
I’m not happy with how the front panel looks yet, I think I need to explore how to change the areas around the tweeter and port. They seem too random and messy, the type of person I want this kit to appeal to is calculated in their decisions and is impressed with precision and detail; attributes which I want my design to have.
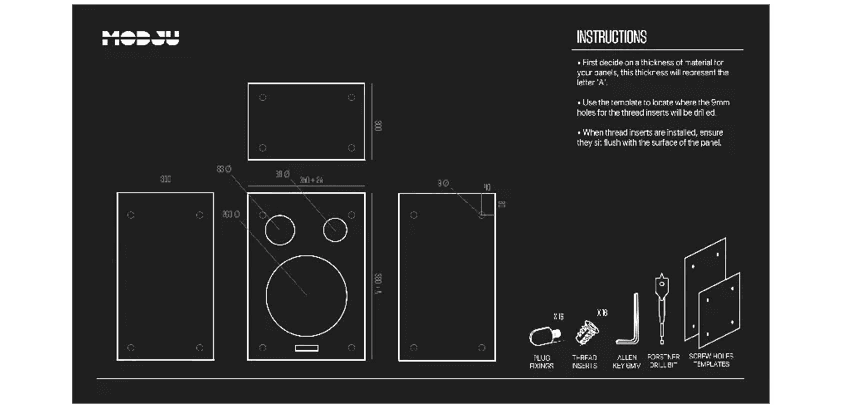
DIY Kit.
I wanted to open up my product to a user group that is DIY orientated so I designed a kit that would provide templates, connectors, hardware, branded tools and instructions to how they can make their own panels. Giving freedom and access for creative people to personalise their speakers.
Final Plug Fixing Developments.
I developed the plug fittings, aiming to change the way they fit to the panels. I removed the flange from the plug part which fits into the bushing and added a M6 screw thread that allows it to be screwed into a thread insert which will be pre-installed into the panel. This will create a strong fixing between the two parts and also allow for the plugs to be easily replaced or removed when storing.
Final Enclosure Development.
My focus for this model was to get the size and proportions of the speaker correct. I got the panels cut on a CNC machine so that the holes for the bushings and washers would be perfectly placed.
The extruded circles that allow for the speaker drivers to sit flush with the front panel once its fitted were a feature that took some development. I have found from this model that they need to have more surface area on the front to allow me screw the tweeter into the wood and create a stable mounting for the drivers.

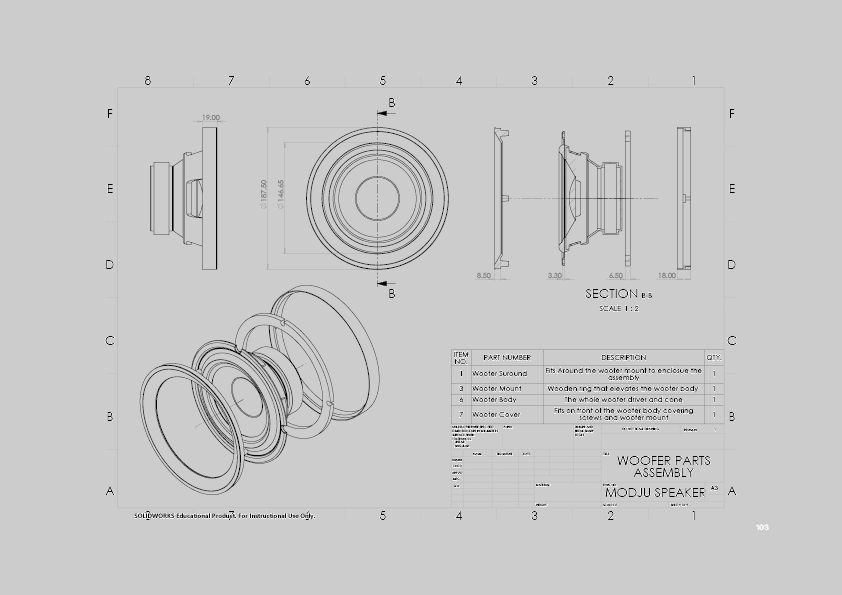
Driver Assembly.
The wooden mount is a precise thickness so that the woofer sits 16mm from the cabinet which allows enough space for the woofer cover to fit in front of it, which then means that the front of the combined parts will lay flush with the front panel (20mm from the cabinet front).
The woofer surround encloses the wooden mount and fixings, not only does this make for a cleaner aesthetic but also provides a smooth surface for the front panel to brush up against when being fitted and removed.
The tweeter has this same configuration at a smaller scale.


Speaker Assembly.
After all my prototypes, creating the final model was a matter of applying the skills and techniques I had learnt to produce a high-quality finished Product. The overall assembly I am extremely happy with the quality of surface finish I achieved is very good, working through the process of oiling and sanding, leaving a smooth-to-the-touch surface. Now the core speaker is complete I can focus my attention on developing the panels for the kits, which will transform how the speaker looks and also showcase the USP of the design, the modular panels.


Craftmanship Joinery.
The exposed mitre joints showcase the craftsmanship and attention to detail that has gone into the design and construction of the speaker. The precision cut corners and edges create a seamless transition between the front and side visible faces of the enclosure.
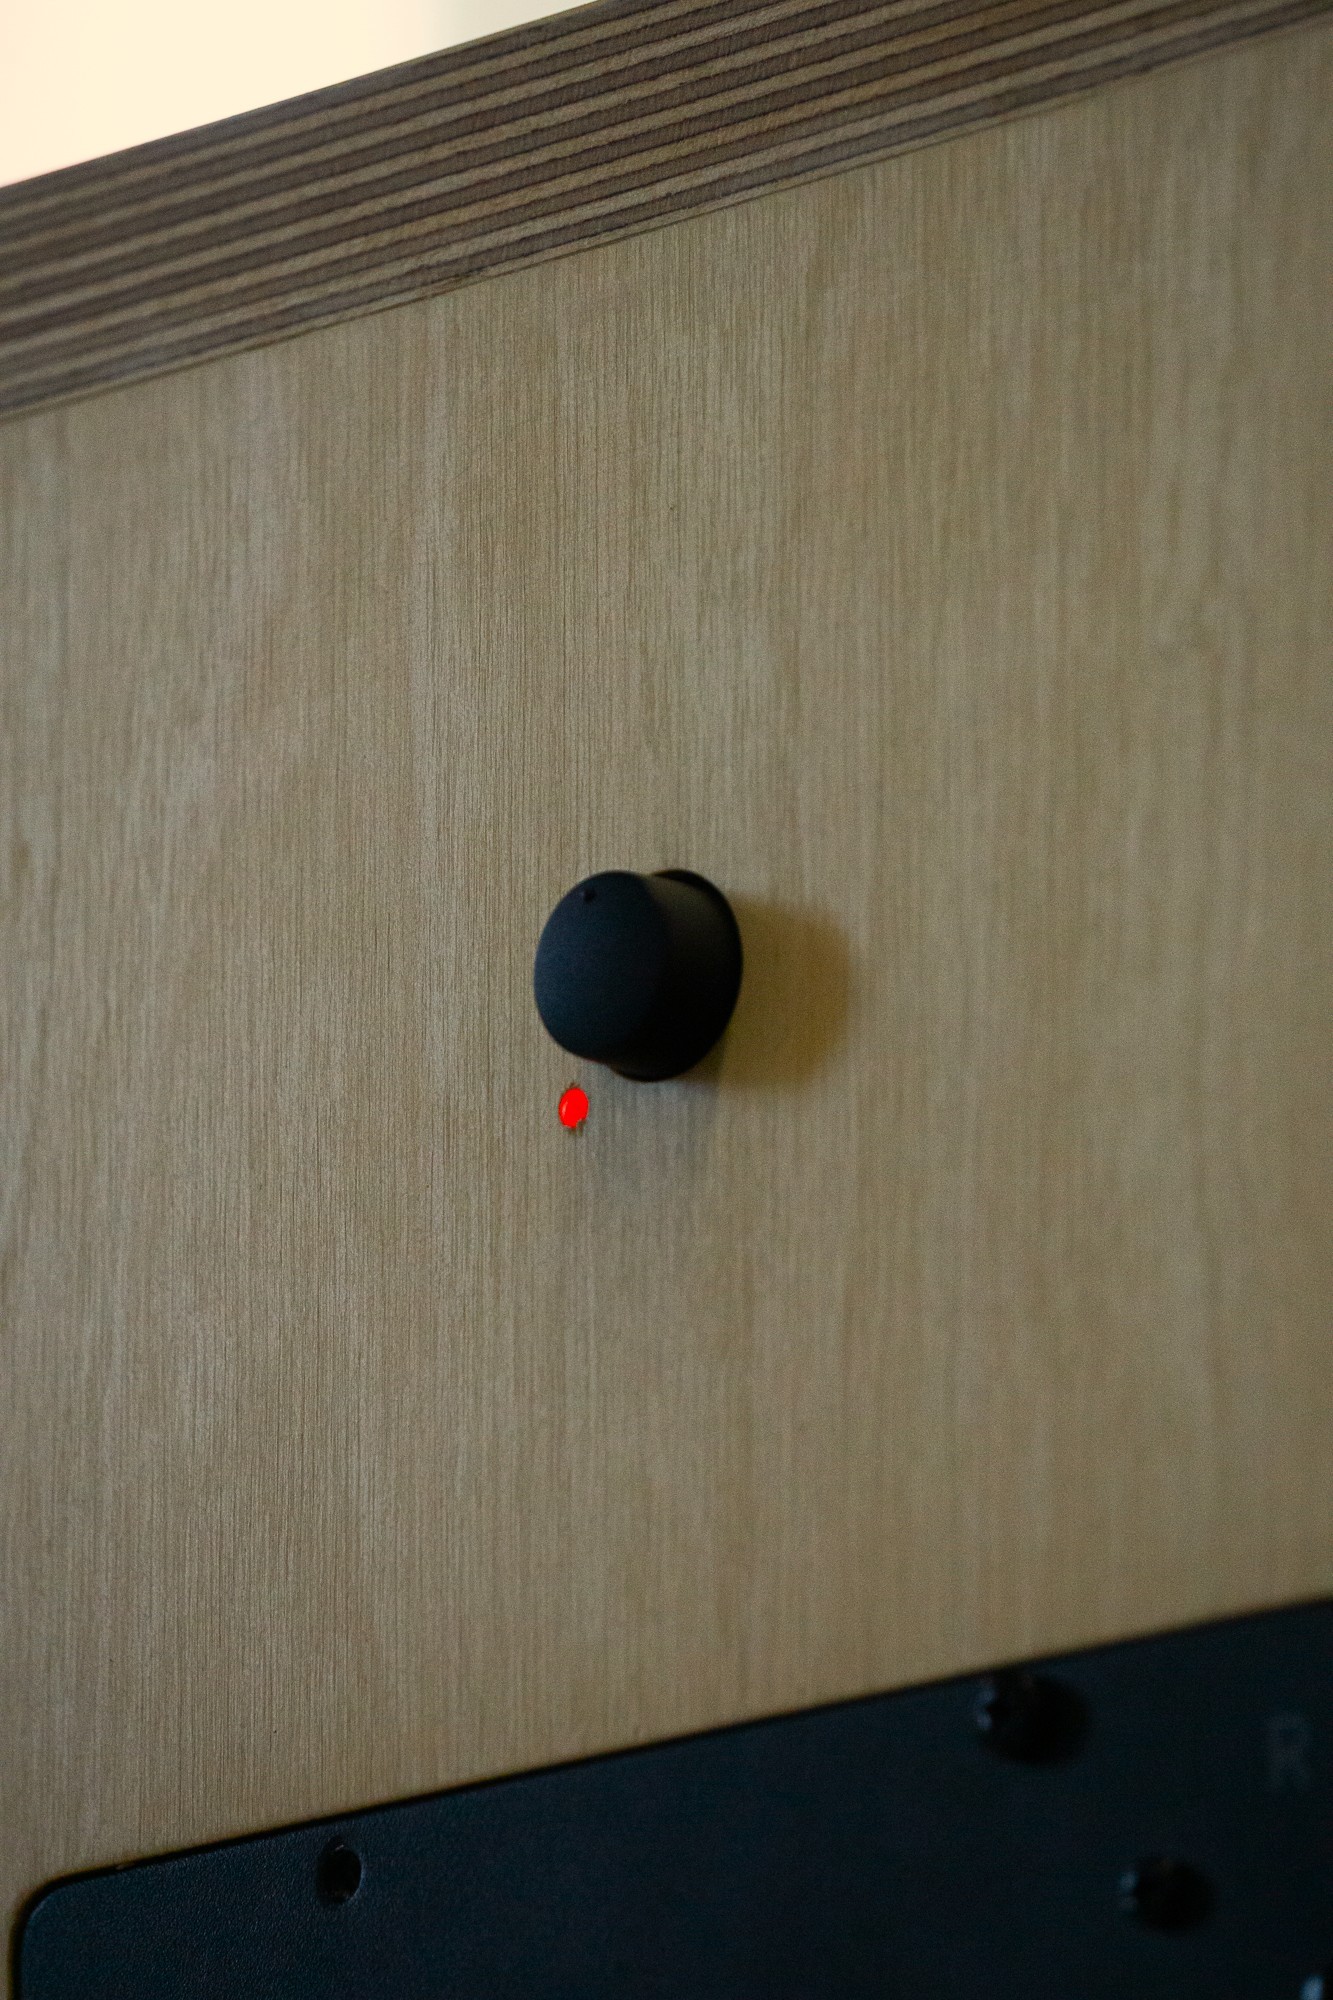
Control Knob.
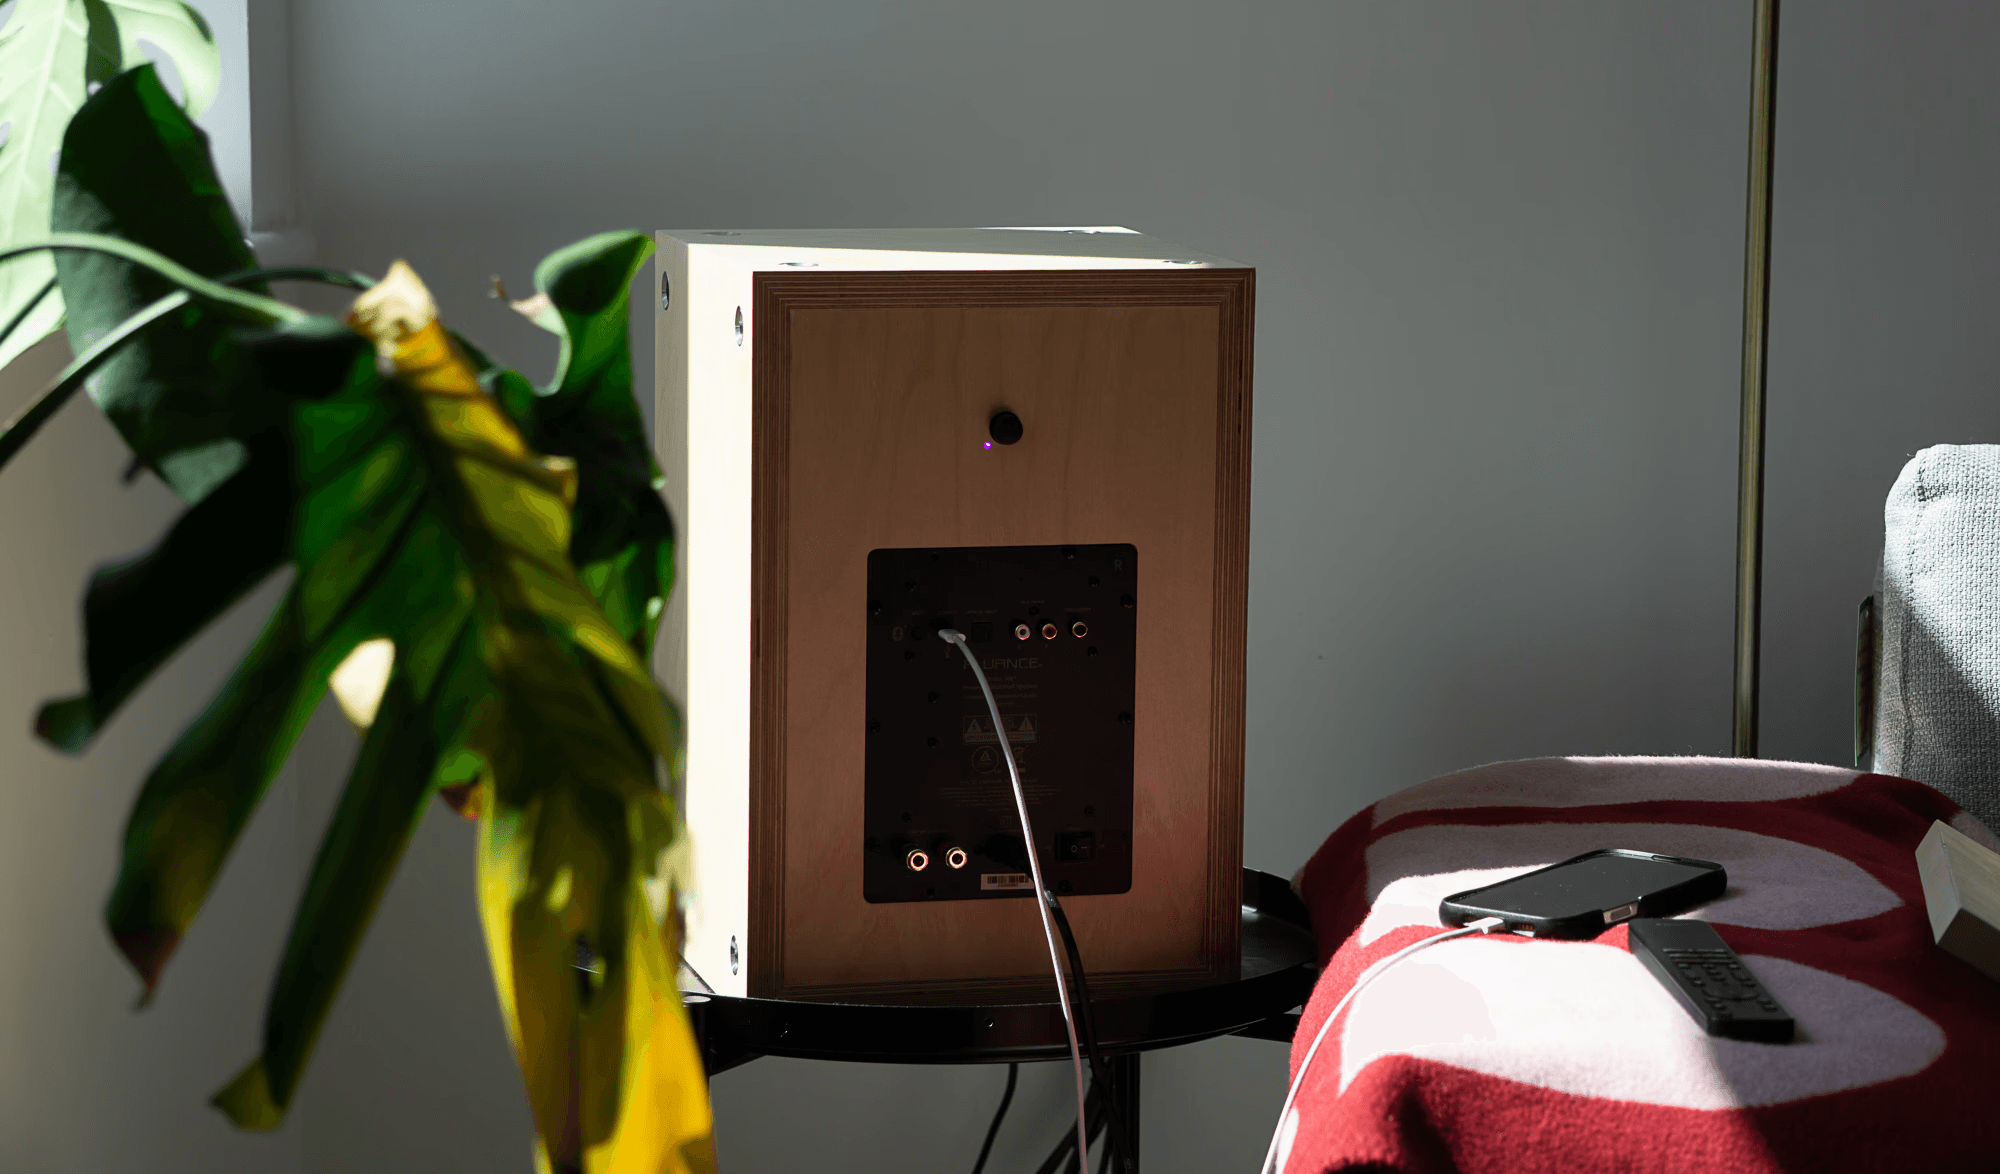
How the user controls the speaker is a very intimate part of a speaker, selecting the input mode and adjusting the volume is all done by this one feature with either a push or a twist. The small LED indicator beside the knob tells the user what input mode the speaker is in by emitting a different colour. Hiding this from the front of the speaker was important for me because it is a feature that is mainly only used while setting up the speaker or input. So for the listening experience having this control accessible on the front would only take away from the front panel aesthetics.

Speaker Internals.
The internals of the speaker can become quite cluttered, for the clarity of sound and sound-wave reflections everything needs to be covered and held to the side so it doesn’t interfere with the speaker drivers. This is done with a variety of foam sheets. A thin layer surrounds the wires and a thicker wall of padding covers all the walls, this creates an environment that dampens the amount of sound-waves that feedback to the speaker driver, creating the illusion that the enclosure is bigger than it actually is making the sound project better and product deeper bass.
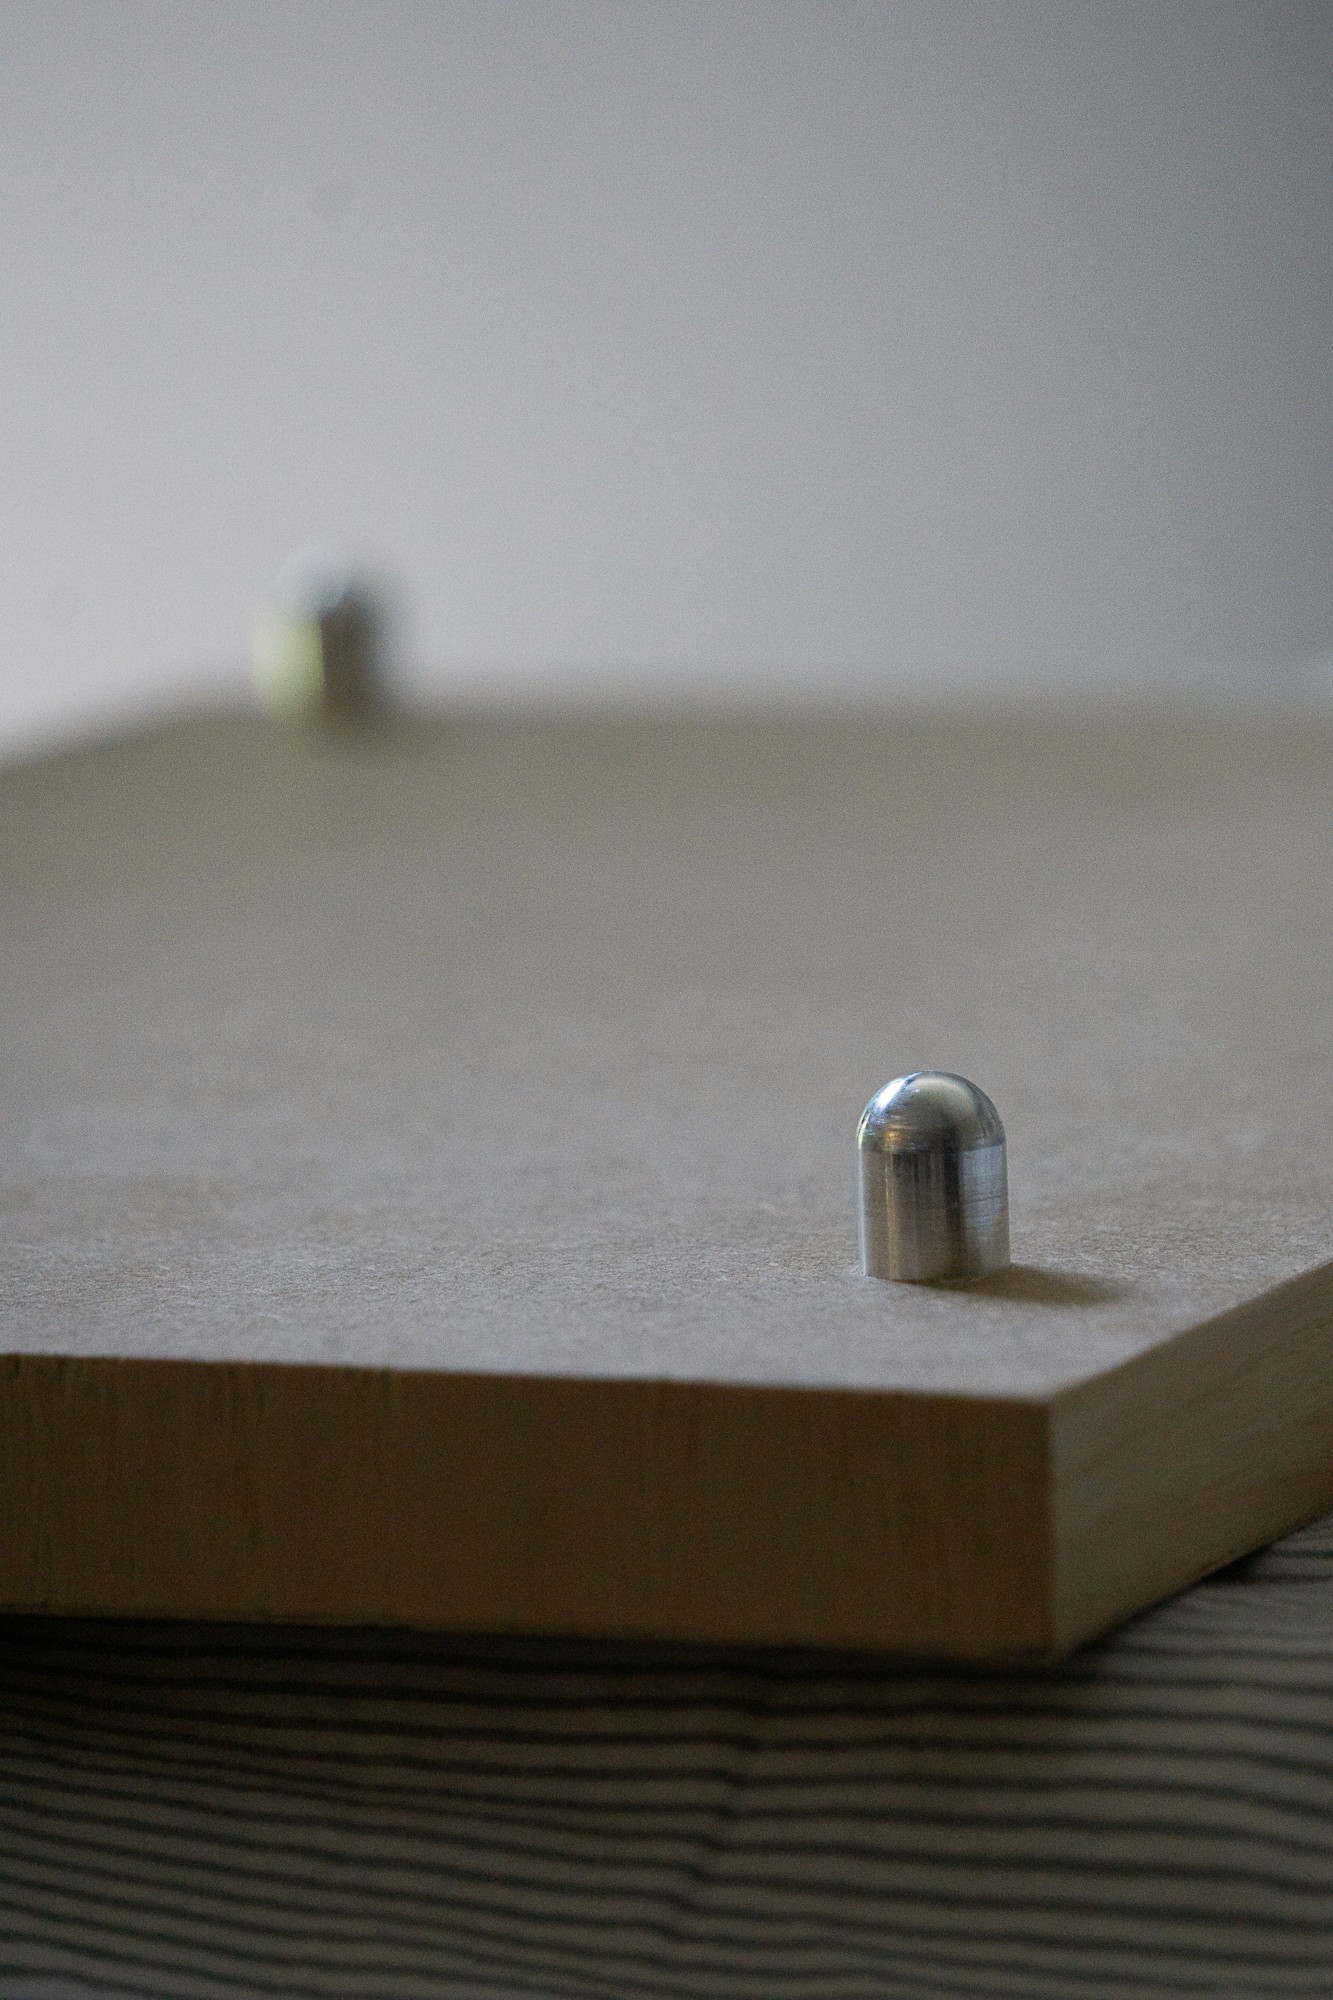
Plug Fittings.
The plug fittings that are attached to the core speaker, they include the TPU bushings and steel washers that face the bushings. Giving a high-quality look to the product, as well as helping the plugs locate into the bushings. If I could change one thing it would be the colour of the bushing, I was limited to grey which is slightly visible when looking into the hole, if I could print them in black then it would reduce this issue.

Panel Plug Connector.
The custom made plugs are screwed into the thread insert in the panel and then the panel can be pushed onto the side of the speaker where the TPU bushing grip onto the aluminium plug and hold it in place. The feature works really well, the fitment requires a firm push but nothing excessive and to remove the panels a leveraged pull from the speaker will remove the top plugs and then the bottom ones will come away with a second pull.
Minimalist Side Panels.
After my previous experiments, I came to the realisation that to get the result for the wavy wood I need to create the whole panel to have the wavy profile and then I can use the vacuum bag to veneer the CNC’d MDF panel to create the look of a wood panel that has been formed and not cut to shape.


Statement Piece Side Panels.
Applying the Organoid Almweisen material to the panel was a process of testing multiple adhesives to see which one worked and looked best. Then I had to test what type of finish to use, Organoid recommended a clear oil finish that would hold the fibres of the material together while not giving a wet shiny look to the surface.

Front Panels.
Applying fabric to wood is not something I had done before so this process was one that I learnt a lot from. I used a paper template to pick out a good part of the material for the panel. I did this same process with the green material for the Minimalist front panel.

Final Branding.
My first attempt at branding the speaker I made the branding piece by vacuum casting aluminium which worked well for achieving the shape of the logo however the metal was not dense enough and sanding it to a chrome-like finish wasn't possible. I went the alternative route and got it machined from Aluminium instead, this gave me a finished piece that was smooth and shiny with little to no imperfections.

Front Panel Inserts.
When the Wannabe material was glued to the panel with an adhesive bond the edge of the material around the hole cut-outs weren’t too neat so I made some covers that would overlap the front face and also extend inwards towards the back of the panel. This creates a smooth and similar surface for the speaker driver covers to move along when the panel is being put on the speaker.

Final Panel Assembly.
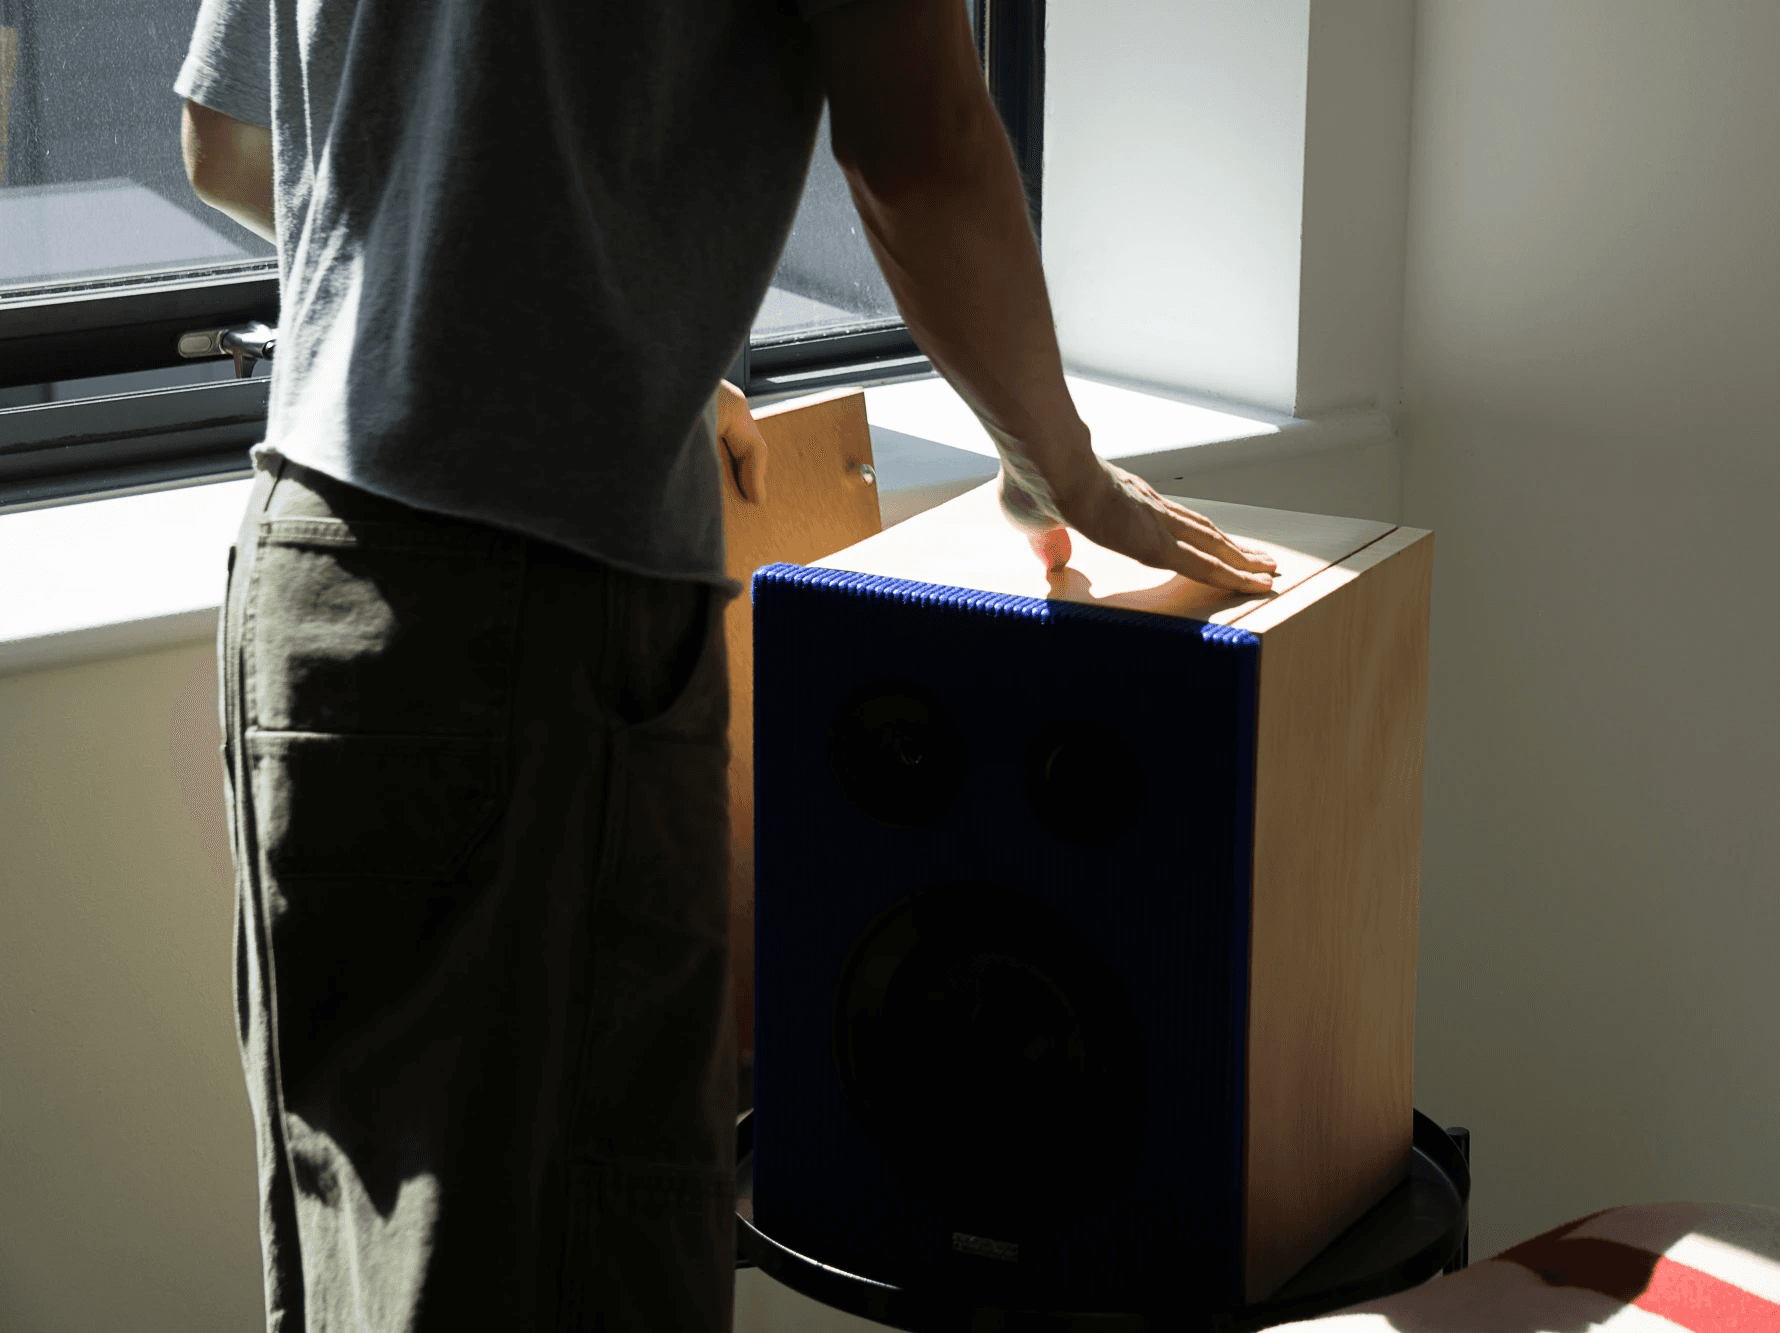
The panels have worked out really well, the gaps between the panels are minimal and even. The combination of materials complement each other well and create the aesthetic of their respective kit names. The wavy wood feature is subtle yet impactful in how the speaker is perceived, moving away from the general ordinary design of speaker. Equally, the eye-catching blue from the ‘Statement Piece’ front panel is also impactful, drawing the viewer's eye to the speaker to then notice the side panel material that further gains the viewer's interest.


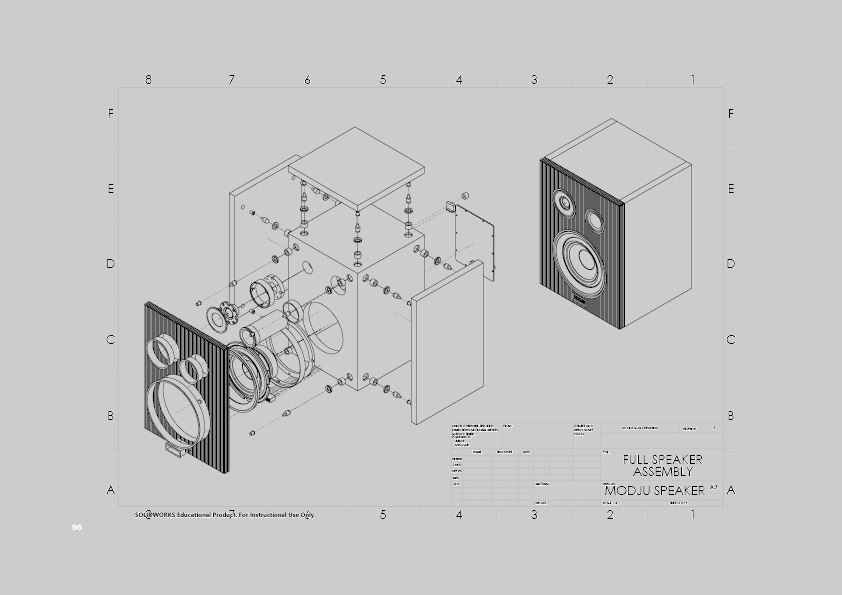
Technical Drawings.
A collection of technical drawings of general product measurements and parts that were custom-designed and made for the completion of the speaker. They give a further outstanding to the size of the components and how they fit together to create the product.


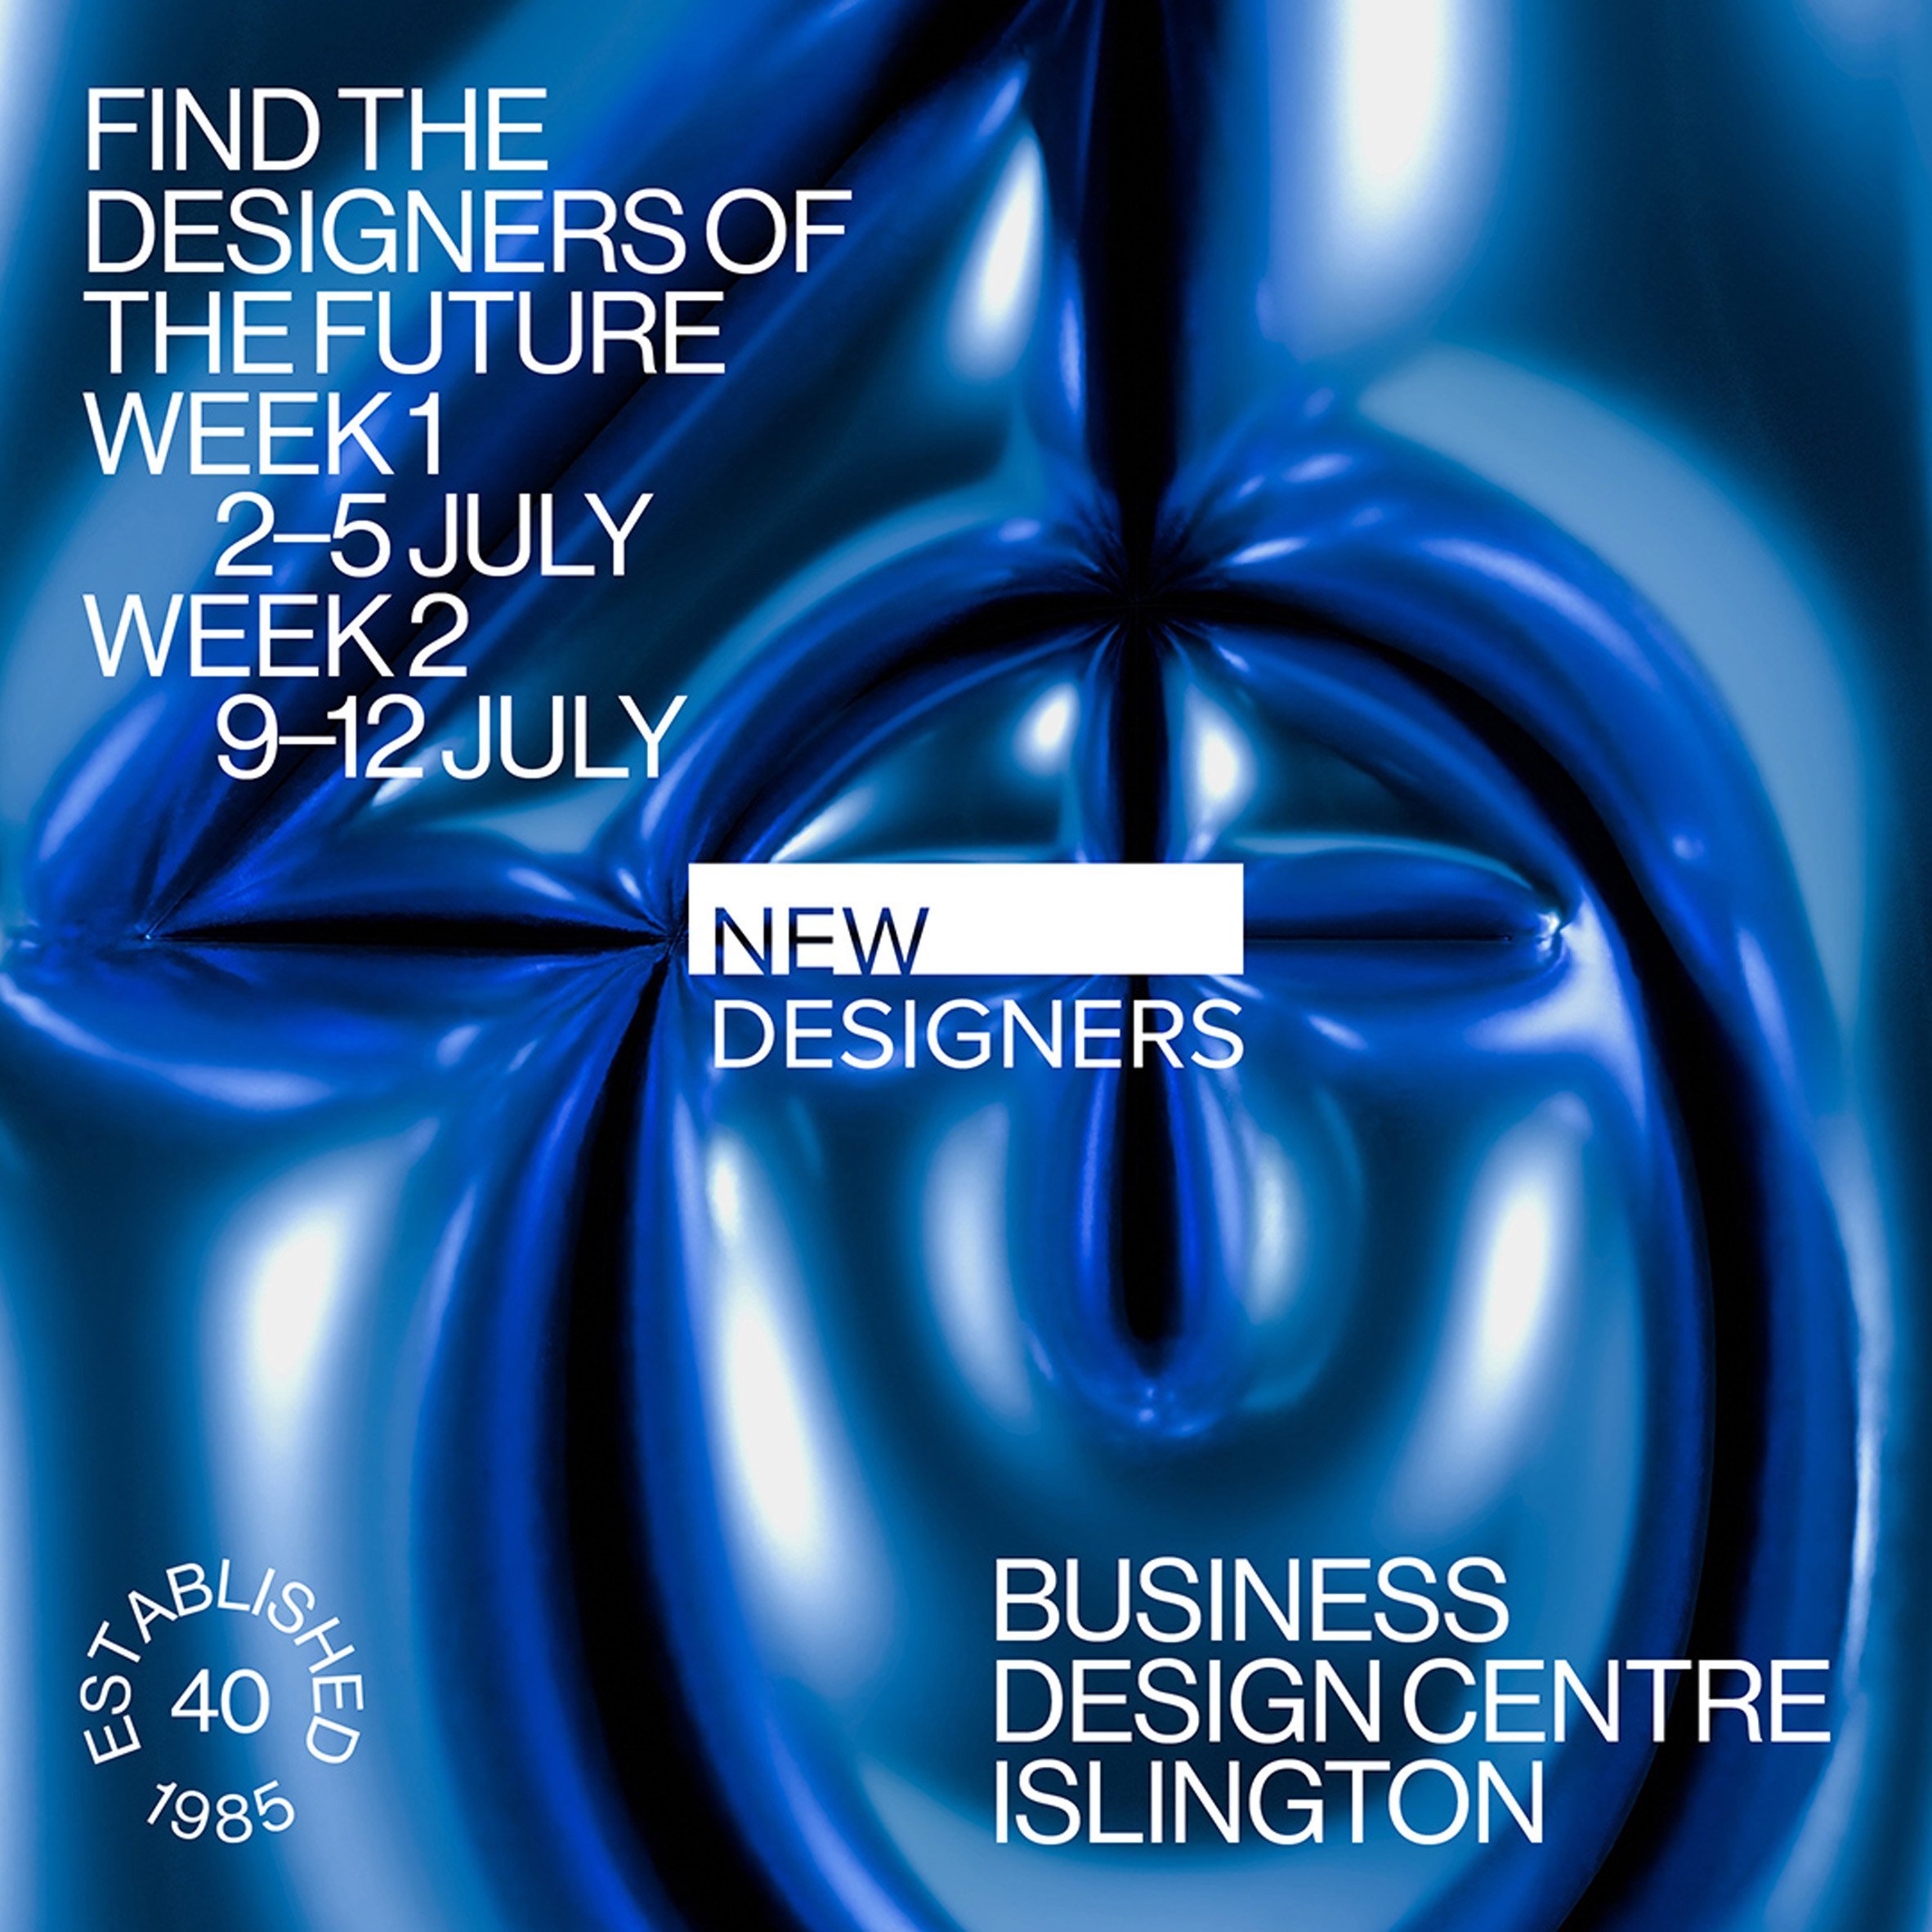
New Designers.
I'm proud to be showcasing this project at New Designers in London on their 40th anniversary. This project has been a significant part of my development as a designer, and I'm excited to have the opportunity to share my speaker with like-minded creatives.